
Lifestyle
The Complete Guide to Akryika: Everything You Need to Know About Acrylic Laminates
Akryika represents a modern solution in interior design materials. It refers to high-quality acrylic laminates used for surfaces in homes, offices, and commercial spaces. These sheets offer a mix of beauty and strength, making them popular among designers and homeowners. In this guide, we cover all aspects of akryika, from its basic features to practical tips. Whether you plan to update your kitchen or build new furniture, understanding akryika helps you make smart choices. We aim to provide clear facts and advice to help you use this material effectively.
What is Akryika?
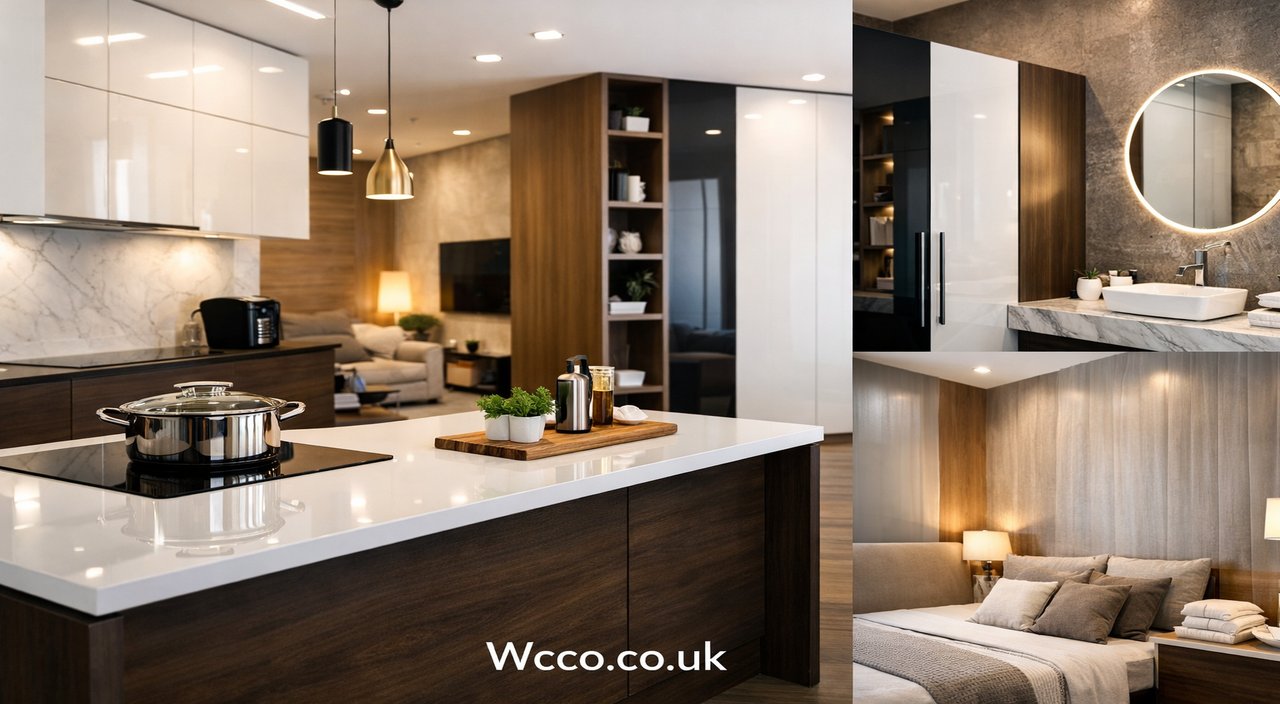
Akryika is a type of acrylic laminate sheet designed for decorative and functional purposes. It consists of a thin layer of acrylic bonded to a base material, creating a smooth, durable surface. Typically 1.5mm thick, akryika comes in sizes like 8 feet by 4 feet, fitting standard projects. The material stands out due to its anti-scratch properties, often rated at 6H hardness, which means it resists marks from daily use. Brands like Acrika produce akryika with these features, ensuring long-lasting performance. This makes it ideal for areas that see a lot of activity, such as kitchens or wardrobes.
Akryika works by combining acrylic’s clear, shiny qualities with laminate’s toughness. The acrylic top layer provides a glossy or matte finish, while the base adds stability. Unlike plain plastic, akryika undergoes special treatments to prevent yellowing and fading over time. It also handles moisture well, reducing the risk of warping in humid environments. For users in regions like South Asia, where weather can be challenging, akryika offers reliable protection. Overall, it balances cost, looks, and practicality, appealing to both beginners and experts in interior work.
History of Akryika Development
The roots of akryika trace back to the mid-20th century when acrylic materials first appeared in manufacturing. Early versions focused on industrial uses, but by the 1980s, they evolved into decorative laminates for homes. Companies began improving formulas to add scratch resistance and better adhesion. In recent years, brands have refined akryika to include UV protection and easier installation methods. This progress came from advances in polymer science, allowing thinner yet stronger sheets. Today, akryika reflects decades of innovation, meeting modern demands for sustainable and versatile options.
In regions like India and nearby countries, akryika gained popularity in the 2010s as urban living increased the need for affordable upgrades. Local manufacturers adapted global techniques to create products suited to tropical climates. Features like anti-scratch coatings became standard, addressing common issues with traditional wood or metal. The rise of online catalogs and social media helped spread awareness, showing real examples of akryika in use. This history shows how akryika shifted from a niche item to a mainstream choice for everyday interiors.
Will You Check This Article: The Ultimate Guide to Toastul: Simple Ways to Make Your Meals Better
Key Benefits of Akryika
One major benefit of akryika is its durability. With a 6H hardness rating, it withstands scratches from keys, utensils, or cleaning tools better than many alternatives. This reduces the need for frequent replacements, saving money over time. Akryika also resists stains, making it easy to wipe clean with mild soap and water. For busy households, this means less effort in upkeep while keeping surfaces looking new. Its lightweight nature further simplifies handling during setup or moves.
Akryika shines in aesthetics, offering high-gloss or matte finishes to match different styles. The glossy option reflects light, creating a sense of space in small rooms, while matte hides fingerprints for a clean look. It comes in various colors and patterns, from solid hues to wood-like grains, allowing custom designs. Environmentally, akryika often uses recyclable materials, appealing to eco-conscious users. Compared to natural stone or glass, it provides similar elegance at a lower cost, making it accessible for budget projects.
Another advantage lies in akryika’s versatility. It bonds well to wood, MDF, or plywood, expanding its applications. In humid areas, its water-resistant properties prevent swelling or peeling. Akryika also handles heat up to certain levels, suitable for kitchen counters near stoves. For safety, it avoids sharp edges and is non-toxic, ideal for family homes. These benefits combine to make akryika a practical pick for long-term value.
Types of Akryika Available
Akryika comes in several types based on finish and purpose. High-gloss akryika features a mirror-like surface that enhances brightness in rooms. It’s popular for modern kitchens and bathrooms where light play adds appeal. This type resists fading from sunlight thanks to UV coatings. Thickness usually stays at 1.5mm for flexibility, but some variants offer extra layers for added strength. Colors range from bright whites to deep blues, suiting various themes.
Matte akryika provides a soft, textured feel that minimizes glare and smudges. It’s favored in offices or bedrooms for a calm atmosphere. This type maintains the same scratch resistance as glossy versions but focuses on subtlety. Patterns mimicking natural materials, like marble or fabric, are common in matte akryika. Sizes remain standard at 8×4 feet, allowing easy cuts for custom fits. Both types share core features like lightweight construction and simple application.
Specialized akryika includes anti-bacterial options for health-focused spaces. These incorporate treatments to reduce germ growth on surfaces. Another variant is fire-retardant akryika, useful in commercial settings. All types prioritize ease of use, with pre-applied adhesives in some cases. Choosing between them depends on the environment and desired look, ensuring akryika meets specific needs.
How to Choose the Right Akryika
Start by assessing your space’s needs when selecting akryika. Consider traffic levels; high-use areas benefit from stronger anti-scratch ratings. Measure the area accurately to pick the right sheet size, avoiding waste. Look at color samples under natural light to ensure they match existing decor. Budget plays a role—standard 1.5mm akryika offers good value, but premium versions add extras like enhanced UV protection. Check warranties, often covering 5-10 years against defects.
Think about finish: glossy for vibrant spaces, matte for subtle ones. Review brand reputations, like those offering consistent quality across batches. Ask for certifications on safety and environmental standards to confirm reliability. If working with professionals, seek their input on compatibility with base materials. Test small samples if possible to see how akryika performs in your setting. This approach leads to a choice that fits both function and style.
Factor in installation ease. Some akryika types come with peel-and-stick backs, simplifying DIY projects. For larger jobs, opt for sheets that cut cleanly without chipping. Consider long-term maintenance; easier-to-clean options save time. Balance cost with quality—cheaper akryika might lack durability, leading to early replacements. By weighing these elements, you select akryika that enhances your space effectively.
Installation Guide for Akryika
Preparing the surface is key before installing akryika. Clean the base material, like plywood or MDF, removing dust and grease. Sand it smooth for better adhesion. Apply a primer if recommended by the manufacturer to improve bonding. Gather tools: a roller for glue, a saw for cutting, and clamps for holding. Work in a well-ventilated area to avoid fumes from adhesives. Measure twice to cut accurately, minimizing errors.
Apply adhesive evenly on the back of the akryika sheet and the base. Use a contact cement for strong hold, following drying times. Position the sheet carefully, starting from one edge to avoid bubbles. Press firmly with a roller, working outward. Trim excess with a sharp blade for clean edges. For joints, use matching edge bands to seal gaps. Allow 24 hours for full cure before using the surface. This method ensures a professional finish.
Handle curves or edges by heating akryika slightly for flexibility, but avoid overheating to prevent damage. In humid climates, use moisture-resistant glues. If hiring help, choose experienced installers familiar with akryika. Common mistakes include rushing alignment or uneven pressure, leading to lifts. Following these steps results in a secure, attractive installation that lasts.
Maintenance Tips for Akryika Surfaces
Daily care for akryika involves gentle wiping with a soft cloth and mild detergent. Avoid abrasive cleaners that could dull the finish. For glossy types, use microfiber to prevent streaks. Address spills quickly to stop staining, especially from acidic substances. Regular dusting keeps surfaces clear of buildup. In kitchens, use coasters under hot items to protect from heat marks. These habits maintain akryika’s appearance with minimal effort.
For deeper cleaning, mix water with vinegar for a natural solution. Apply sparingly and rinse well. Matte akryika benefits from occasional polishing with specific products to restore texture. Inspect for scratches; minor ones can be buffed out with fine sandpaper. Store cleaning supplies away from akryika to avoid accidental damage. In high-humidity areas, ensure good ventilation to prevent moisture issues. Consistent maintenance extends akryika’s life significantly.
Preventive measures include using protective mats in heavy-use zones. Teach family members proper handling to reduce wear. Schedule annual checks for loose edges or discoloration. If damage occurs, repair kits for akryika can fix small areas without full replacement. By following these tips, you keep akryika looking fresh and functional for years.
Applications of Akryika in Home Interiors
In kitchens, akryika serves as cabinet fronts and backsplashes. Its water resistance handles splashes, while scratch protection withstands daily tasks. Choose glossy akryika for a bright, open feel or matte for a cozy vibe. It pairs well with modular designs, allowing easy updates. Homeowners appreciate how akryika mimics expensive materials like granite at a fraction of the cost. This application transforms ordinary spaces into efficient, stylish areas.
For bedrooms, akryika works on wardrobe doors and headboards. Its lightweight build makes sliding mechanisms smooth. Patterns in wood tones create a warm atmosphere without real timber’s upkeep. Akryika’s non-porous surface resists dust, aiding allergy sufferers. Install it over existing furniture for quick makeovers. This use highlights akryika’s role in creating peaceful, low-maintenance retreats.
Living rooms benefit from akryika on TV units and coffee tables. The material’s durability handles family gatherings, while varied finishes complement decor. Use it for wall panels to add texture without heavy construction. Akryika’s flexibility allows curved designs for unique features. Overall, it enhances comfort and visual interest in shared spaces.
Akryika in Office and Commercial Spaces
Offices use akryika for desks and partitions. Its clean lines support modern workspaces, and matte finishes reduce distractions from reflections. Anti-bacterial options promote hygiene in shared areas. Akryika’s quick installation minimizes downtime during setups. Colors can match branding, boosting professional appeal. This makes it a smart choice for productive environments.
In retail settings, akryika forms display shelves and counters. Its strength supports heavy items, while glossy surfaces draw attention to products. Easy cleaning keeps stores looking sharp. Custom cuts fit irregular spaces, maximizing layout efficiency. Commercial users value akryika’s cost-effectiveness for large-scale projects. It delivers a polished look that attracts customers.
Hotels apply akryika in bathrooms and lobbies. Water-resistant properties suit wet areas, and variety in designs fits themes. Maintenance ease helps staff manage high traffic. Akryika’s longevity reduces replacement frequency, controlling costs. This application shows its adaptability in hospitality.
Comparing Akryika to Other Materials
Versus wood, akryika offers better resistance to moisture and pests. Wood needs sealing and can warp, while akryika stays stable. However, wood provides natural warmth that akryika imitates through patterns. Cost-wise, akryika is cheaper for similar looks. Installation is faster with akryika, avoiding woodworking skills. For eco-friendly choices, sustainable akryika matches responsibly sourced wood.
Compared to glass, akryika is lighter and shatter-resistant, safer for homes with kids. Glass shows fingerprints more, requiring frequent cleaning. Akryika provides similar shine but at lower weight and price. Both handle light well, but akryika flexes for curved uses. This makes akryika preferable for practical applications.
Against metal, akryika avoids rust and dents easier. Metal conducts heat, while akryika insulates better. Aesthetics differ: metal suits industrial styles, akryika fits contemporary ones. Maintenance for akryika is simpler, without polishing needs. Overall, akryika balances pros from multiple materials.
Common Mistakes to Avoid with Akryika
One error is skipping surface prep, leading to poor adhesion. Always clean and sand bases thoroughly. Another is using wrong adhesives; choose those made for acrylic laminates. Overcutting sheets wastes material—measure precisely. Ignoring finish types can mismatch styles; test samples first. Rushing curing time risks shifts or bubbles. Avoid these for successful results.
Misjudging thickness needs causes issues. 1.5mm akryika suits most, but check load requirements. Forgetting edge treatments leaves rough spots; use bands for finishes. Storing akryika improperly warps it—keep flat in cool areas. Not consulting pros for complex jobs increases errors. Learning from these pitfalls ensures smooth projects.
Overlooking warranties voids coverage; follow guidelines closely. Using harsh chemicals damages surfaces; stick to mild cleaners. Assuming all akryika is identical ignores brand differences in quality. Research options carefully. By steering clear of these, you maximize akryika’s benefits.
Future Trends in Akryika
Trends point to smarter akryika with integrated tech, like touch-sensitive surfaces. Eco-materials will rise, using recycled acrylic for green builds. Custom prints allow personalized designs via digital methods. Thinner yet stronger versions may emerge, expanding uses. Colors will evolve with fashion, including bold or subtle tones.
Sustainability drives bio-based akryika, reducing petroleum reliance. Antimicrobial features will standard in post-pandemic designs. Modular systems ease reconfigurations. Global markets will see more affordable akryika through efficient production. These shifts promise exciting options for users.
Integration with smart homes could include akryika panels for controls. Enhanced fire resistance meets stricter codes. Trends favor versatile, user-friendly materials like akryika. Staying informed helps leverage these advances.
Conclusion: Why Choose Akryika Today
Akryika stands as a reliable, attractive material for today’s interiors. Its blend of durability, ease, and affordability addresses common design challenges. From homes to businesses, akryika adapts to needs while offering lasting value. This guide covers essentials to start your project confidently. Consider akryika for your next update— it promises satisfaction and style.
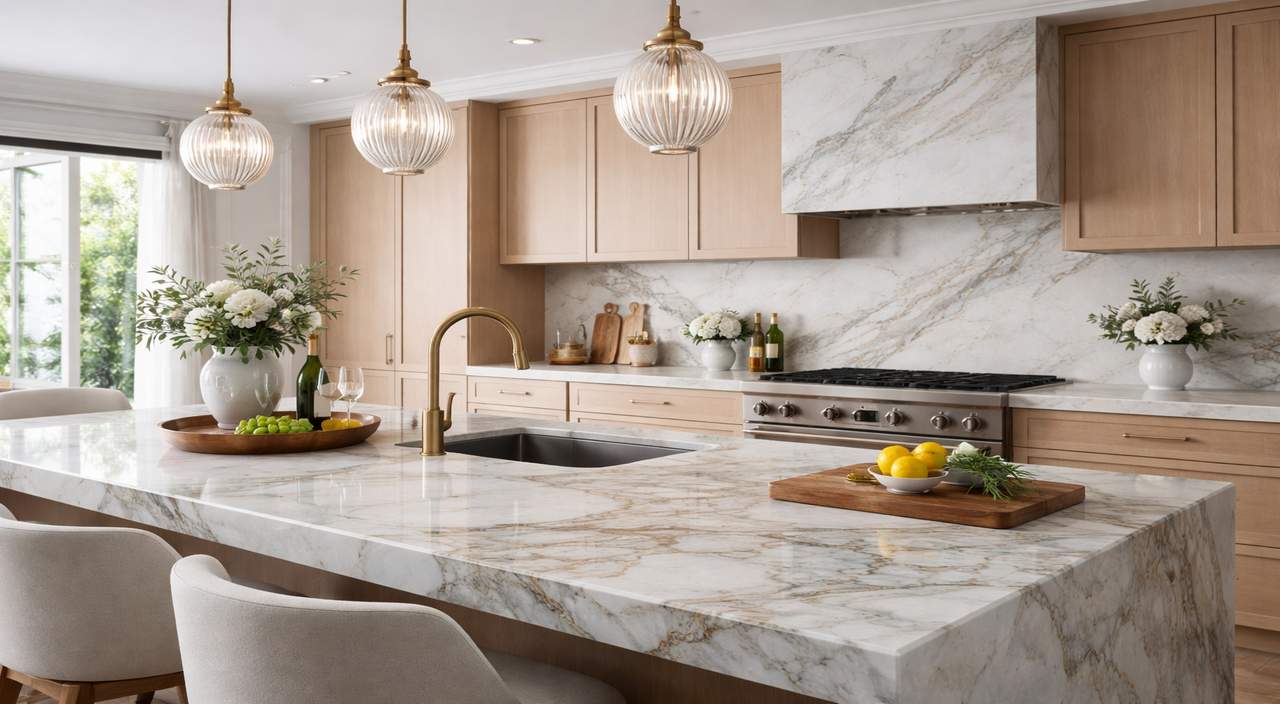
In the world of high-end kitchen design, the quest for a surface that seamlessly blends breathtaking beauty with formidable strength is never-ending. While granite and engineered quartz have long been popular contenders, a natural stone has been steadily rising to the forefront, captivating homeowners and designers alike: quartzite. Far more than just a “pretty face,” quartzite worktops represent a compelling fusion of geological drama and practical resilience. This article delves into the essence of quartzite, exploring its unique characteristics, benefits, considerations, and care, to help you determine if this remarkable stone is the destined centerpiece for your culinary space.
The Geological Marvel: What is Quartzite?
To truly appreciate a quartzite worktop, one must understand its extraordinary origin story. Quartzite begins its life as humble sandstone, composed primarily of quartz grains. Over millions of years, through immense heat and pressure deep within the earth’s crust, these grains are fused together in a process called metamorphism. The result is a supremely hard, non-foliated rock that is, in essence, nature’s own engineered stone a monolithic slab of nearly pure quartz. This dramatic genesis is key to its performance; unlike softer marbles or even some granites, quartzite’s crystalline structure grants it exceptional density. It’s crucial to distinguish it from engineered quartz, a man-made composite of crushed quartz and resins. While both are excellent, quartzite offers the unique, unrepeatable veining and color shifts of a natural stone, with each slab being a one-of-a-kind piece of planetary history.
Unrivalled Durability and Heat Resistance
The metamorphic process bestows upon Quartzite worktops a legendary toughness that is a primary draw for busy kitchens. On the Mohs scale of mineral hardness, quartzite typically ranks between a 7 and 8, placing it just below diamonds and corundum (sapphires/rubies). In practical terms, this translates to a remarkable resistance to scratching. You can chop, prep, and place cookware directly on its surface with far less anxiety than with many other materials. Furthermore, quartzite is exceptionally heat resistant. While always recommended to use trivets for extreme temperatures, its natural composition allows it to withstand hot pots and pans better than engineered quartz, whose resin binders can be damaged by high heat. This combination makes it a dream surface for those who love to cook and entertain, offering a fortress-like durability that stands up to the rigors of daily life while maintaining its elegant appearance.
A Palette of Breathtaking, Natural Beauty
If durability provides the compelling argument, the aesthetics of quartzite deliver the knockout punch. Quartzite worktops are celebrated for their stunning visual depth and movement. They often feature soft, ethereal backgrounds in shades of white, grey, silver, or pale gold, swept through with dramatic, painterly veining in tones of charcoal, blue, rust, or gold. The patterns can range from bold, Carrara-marble-like swirls to delicate, feathery filaments, offering a look that many desire from marble but with significantly greater resilience. This natural artistry ensures no two kitchens are alike. Slabs like White Macaubas, Taj Mahal, or Sea Pearl have become iconic, offering a luxurious and timeless appeal that can elevate the entire design scheme of a kitchen, from modern minimalist to rustic farmhouse.
Maintenance and Sealing: The Essential Care Regimen
While quartzite is incredibly hard, it is not entirely impervious. Its porosity can vary, but most quartzite worktops require an initial sealing with a high-quality, penetrating sealer upon installation. This sealant fills the microscopic pores in the stone, creating a barrier against stains from oils, wines, or acids like lemon juice and vinegar. Unlike the near-zero maintenance of engineered quartz, quartzite does demand this periodic commitment typically resealing once a year to maintain its optimal stain resistance. Daily care, however, is straightforward: clean with mild soap and warm water, and avoid harsh abrasive cleaners or acidic solutions that could degrade the sealant over time. With this simple regimen, your quartzite surface will retain its luminous beauty for decades.
Quartzite vs. The Alternatives: Making an Informed Choice
The decision often comes down to quartzite versus its two main rivals: granite and engineered quartz. Granite offers similar natural variation and good hardness but can be less consistent in pattern and may not achieve the same luminous, marble-like aesthetic many seek with quartzite. Engineered quartz provides unparalleled uniformity, a vast array of consistent colors, and requires no sealing, but it cannot match quartzite’s natural depth, unique patterning, or its superior heat resistance. Quartzite occupies a prestigious middle ground: it offers the authentic, geological artistry of natural stone with a hardness that frequently surpasses granite and a heat tolerance that outclasses engineered quartz. It is the choice for those who refuse to compromise between uncompromising beauty and formidable function.
Conclusion: An Investment in Timeless Elegance
Choosing a quartzite worktop is an investment, not just in your home’s financial value, but in the daily experience of your kitchen. It is a commitment to a surface that tells a story a narrative of ancient geological forces captured in stone. It promises a backdrop for family meals, creative cooking, and cherished gatherings that will only grow more beautiful with time, developing a soft patina of life lived well. While it asks for a modest degree of care in return, it rewards you with a breathtaking, durable, and uniquely personal focal point. In the symphony of kitchen design, quartzite is not just another note; it is a enduring, natural masterpiece that performs brilliantly, season after season.
Read more on WCCO

Moving across the country is one of life’s most significant transitions. Whether you’re relocating from New York to California or Texas to Washington, a well-organized approach can transform a potentially stressful experience into an exciting new chapter. This comprehensive guide will walk you through everything you need to know about cross country moving, complete with state-specific considerations and expert advice from professional long distance moving companies.
Understanding Cross Country Moving: What Makes It Different
Cross country moving differs significantly from local relocations. When you’re moving hundreds or thousands of miles away, you’re dealing with multiple state regulations, longer transit times, and more complex logistics. Professional cross country movers specialize in these unique challenges, offering services that go beyond simply loading a truck.
Long distance moving companies like Jordan River Moving understand that interstate moves require meticulous planning, proper licensing, and expertise in navigating different state requirements. Unlike local moves that might take a few hours, cross country moving can span several days or even weeks from start to finish.
8 Weeks Before Moving Day: The Planning Phase
Research and Hire Cross Country Movers
Start your journey by researching reputable long distance moving companies. Look for movers with:
- Valid USDOT and MC numbers (required for interstate moves)
- Positive customer reviews and Better Business Bureau ratings
- Transparent pricing with written estimates
- Proper licensing in both your origin and destination states
- Comprehensive insurance options
Request in-home estimates from at least three cross country movers. During these consultations, ask about their experience with your specific route, storage options, and any state-specific requirements.
Create Your Moving Budget
Cross country moving costs vary based on distance, volume, and services required. Your budget should include:
- Professional moving services or truck rental
- Packing materials and supplies
- Travel expenses (hotel, gas, meals)
- Utility deposits and connection fees
- Vehicle shipping (if applicable)
- Storage costs (if there’s a gap between move-out and move-in dates)
- Emergency fund (plan for 10-15% over your estimate)
Begin Decluttering and Downsizing
The less you move, the less you pay. Cross country moving is the perfect opportunity to minimize your belongings:
- Sort items into keep, donate, sell, and discard categories
- Host a garage sale or list items online
- Donate usable items to local charities
- Dispose of hazardous materials that can’t be transported across state lines
6 Weeks Before Moving Day: Documentation and Logistics
Gather Important Documents
Create a moving folder (physical or digital) containing:
- Lease agreements or closing documents
- Driver’s licenses and identification
- Medical records and prescriptions
- School records and transcripts
- Vehicle registration and insurance
- Financial documents and bank statements
- Pet vaccination records
- Insurance policies
Update Your Address
Begin the address change process with:
- United States Postal Service (forward mail 2-4 weeks before your move)
- Employer and the human resources department
- Banks and credit card companies
- Insurance providers (health, auto, life, home)
- Subscription services
- Professional licenses and memberships
- Voter registration
Research Your Destination State
Different states have varying requirements and timelines for newcomers. Here’s what you need to know:
Driver’s License and Vehicle Registration Timeline by State:
- California: 10 days to register vehicles, 10 days for driver’s license
- Texas: 30 days for vehicle registration, 90 days for driver’s license
- Florida: 30 days for both vehicle registration and driver’s license
- New York: 30 days for vehicle registration, no specific timeline for license transfer
- Washington: 30 days for vehicle registration, no specific deadline for driver’s license
- Colorado: 90 days for vehicle registration, no specific deadline for license
- North Carolina: 60 days for vehicle registration, 60 days for driver’s license
- Arizona: 15 days for vehicle registration, 10 days for driver’s license
State-Specific Moving Considerations:
Some states have unique requirements that long distance moving companies may not handle for you:
- California: Vehicles entering the state must pass emissions testing at border inspection stations
- Hawaii: Strict agricultural inspection and quarantine requirements for plants and pets
- Alaska: Limited road access; many moves require ferry or air transport
- Florida: High humidity requires special packing considerations for electronics and wooden furniture
- Arizona and Nevada: Extreme heat can affect certain items during summer moves
Frequently Asked Questions About Cross Country Moving
1. How much does it cost to hire cross country movers?
The average cost for long distance moving companies ranges from $2,000 to $5,000 for a typical 2-3 bedroom home moving across the country. For a cross country move from coast to coast (approximately 3,000 miles), expect to pay $4,000-$8,000 for a 3-bedroom home with full-service movers.
2. How far in advance should I book cross country movers?
Book long distance moving companies 6-8 weeks in advance, especially if moving during peak season (May-September). For off-season moves, 4-6 weeks is typically sufficient.
3. How long does cross country moving take?
Transit time with professional cross country movers typically ranges from 3-14 days, depending on distance, route, weather conditions, and type of service.
Read more on WCCO
The concept of “home” has seen a paradigm shift in recent times. We have seen a change in how people, especially modern homeowners perceive home. Our living spaces are not just a residing place, but have become more personal and expressive and it reflects in the items we introduce in our homes. They are not just utilities, but reflect our identity.
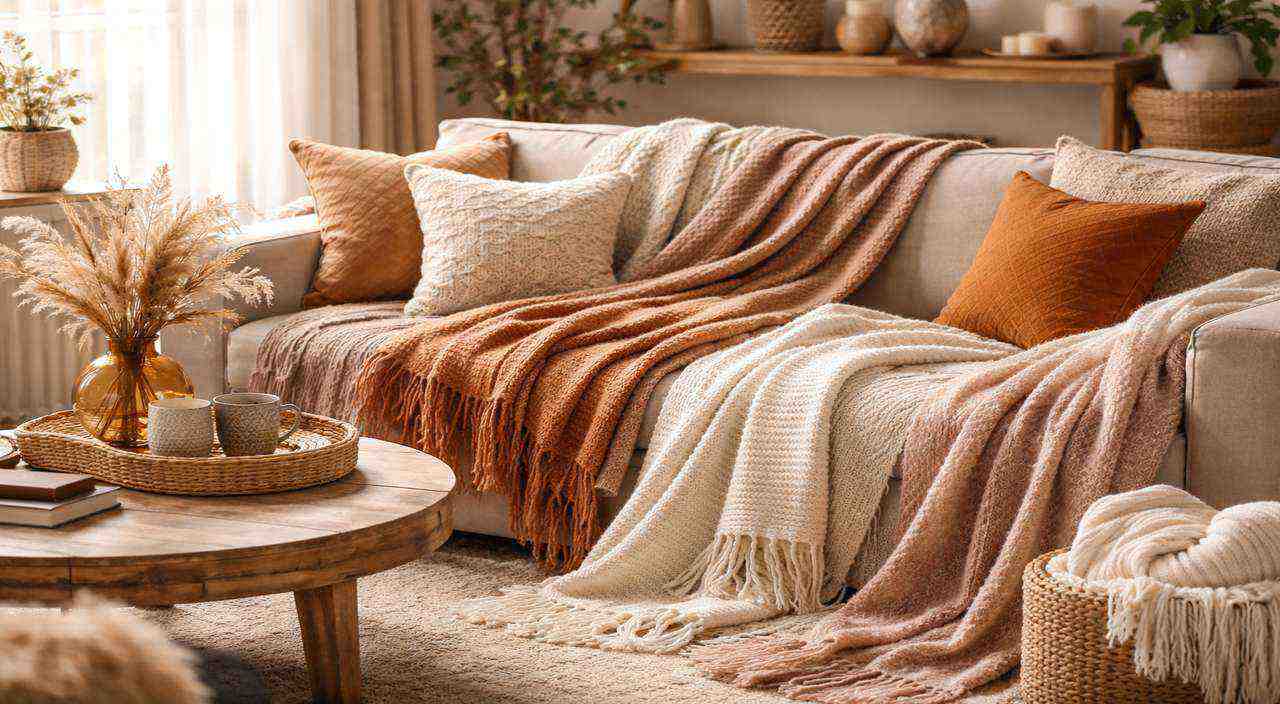
For example, unique throw blankets are not just a piece to be put back on the sofa. They have become functional decor statements. Today, we have moved from mass-produced throws to designer-inspired pieces that offer comfort and sublime visual appearance.
Why are throw blankets considered unique in 2026? Because modern throw blankets are the combination of high-concept design, sustainable craftsmanship, and sensory styling. These soft throws for the couch are not just utility pieces, but enhance the overall appeal of the home.
Defining Uniqueness in Modern Throw Blankets
If you want to know why throw blankets are unique today, we must look beyond price tags. Modern throw blankets are defined by there pillers:
- Textual Complexity: Homeowners now prefer sculpted fabrics to experience the 3D effect of the material.
- Artisanal Craftsmanship: A unique throw carries the marks of the manufacturer and ensures that no two pieces are identical.
- Purposefully Design: When you choose a stylish throw blanket, you choose a blanket that is designed with a specific mood. Some offer architectural structure to a chair, while others are designed for deep-pressure relaxation.
2026 Throw Blanket Trends Redefining Home Comfort
Throw blanket trends in 2026 prioritize longevity over fashion for the home. Let’s deep dive into it.
Elevated Neutrals and Earthy Tones
While homeowners still prefer vibrant colors,neutral throw blankets in different shades like warm stone, terracotta, and deep loss are popular currently. They offer a tone of grounding and calmness. They are considered the best throws for living room spaces that give a mesmerizing look to the room.
Statement Textures
You will find ribbed, woven, and sculpted looks in modern homes. However, textured throw blankets are the new normal, thanks to their aesthetic appeal. They add depth to a room without needing loud patterns. You can also go for thick chunky baskets or waffle patterns that look rich and create shadows to add a designer feel.
Handcrafted and Artisan-Inspired Throws
Today, patterned throw blankets are highly popular as they can utilize ikat, jacquard, or block-printing methods, serving as functional art and bridging the gap between a textile and a tapestry.
Lightweight, Year-Round Throws
Homeowners have shifted to climate-conscious living, leading to a rise in lightweight throw blankets that are trans-seasonal. These throw blankets offer comfort in the summer under air-conditioning and layering potential in winter.
Fabric Choices That Set Throw Blanket Apart
We all love the feel of the fabric and consider it a parameter while choosing bedding solutions. The choice of material determines whether a throw is a seasonal accessory or a lifetime companion.
- Natural Fibers: Cotton and linen blends are the gold standard for breathable throw blankets. Their breathability and temperature regulation properties make them ideal for throw blankets for sofa throughout the year.
- Performance Blends: You can also incorporate performance blends that mimic silk or will, but offer machine washable durability. You can go for a Madison Park bedding set as they are lightweight, durable, and easy to maintain.
- The Luxury of Faux: High-density luxury faux fur throws are also popular, thanks to a new level of realism they bring on the table. They are cozy and comfortable and suitable for modern homes.
- The Weight Factor: Should you go for lightweight Vs Cozy textures? The answer lies on your internal thermostat. Homeowners now prefer easy-care luxury blends over high-maintenance fabrics that offer the same buttery feel without worrying about the maintenance part.
Styling Throw Blankets for a Curated Lived-In Look
Just buying decorative throw blankets is not enough, their placement also matters to achieve the lived-in, Pinterest-worthy look.
Living Rooms Sofas and Accent Chairs
Don’t just think of the sofa when it comes to placing throw blankets. Think of something out-of-box like casually tossing over one corner to create an inviting environment. If you have a leather chair in your bedroom or living room, a statement throw blanket with a rougher texture offers a beautiful visual contrast against the smooth hide.
Bedroom Layering
In a bedroom, you can layer it up to transform them into a sanctuary. You can place a unique throw blanket at the foot of the bed, layered over your duvet or you can fold it neatly for a hotel-like look.
Reading Corners and Home Offices
For reading corners and home offices, you can use a cozy throw to put there to add warmth during long calls. It will soften the corporate look of the home office.
Choosing Throws That Fit Your Everyday Life
Make sure that you choose throws that define your personality and lifestyle. A luxury throw blanket is good only if it survives your daily routine.
- Minimalist Homes: You can go for monochromatic textured throw blankets to keep the space serene and beautiful, but not boring.
- Family-Friendly Spaces: Don’t compromise on durability. Go for cotton-based decorative throws for couch that are easy to maintain and don’t lose texture after repeated washes.
- Small Apartments: For small apartments, you can go for a lightweight throw blanket that can add an extra layer on the bed at night and a stylish wrap while watching TV.
Using Throw Blankets to Express Personal Style
Don’t forget your personality and style while choosing throw blankets. You can go for neutral or statement throw blankets that define your style and personality.
Think of balance between style and comfort and always try to bridge the gap. For example, for a flat room, go for a patterned throw to introduce a new color story without the need to paint a wall. Similarly, if your sofa has a small-scale print, go for a throw with a large, bold pattern.
A Smart Buyer’s Guide for 2026: What to Look For
- Material Quality: Never compromise on material quality as it will determine the comfort and durability. Go for long-staple cotton or high-grade synthetic fibers.
- Weight and Seasonality: Go for lightweight, luxury throw blankets that can be used throughout the year.
- Durability: Check the edges and make sure that they are reinforced.
- Versatility: Can you move the blanket from the bedroom to the living room seamlessly?
- Design Longevity: Does it offer a timeless aesthetic appeal or will fade away after a few washes?
Common Mistakes: What Can Make a Throw Feel Ordinary?
Even the most expensive luxury throw can fail to serve the core purpose if chosen poorly. Avoid these pitfalls.
- Overmatching: Don’t buy a throw of the color of your sofa. It will not look good and appealing. Aim for at least one or two shades lighter or darker.
- Ignoring Feel: How does it feel when you touch the throw? Does it feel good or scratchy? Don’t go for scratchy throws that will feel dull and uninvited.
- Trend-Only Designs: It is not wise to just follow trends like ultra-neon or specific novelty shapes.
Frequency Asked Questions
What makes a throw blanket unique?
In 2026, uniqueness of a throw blanket can be determined by artisanal details, unconventional textures, and sustainable and durable materials. You need to choose a piece that does not just serve the utility purpose, but acts as a focal point of the room with its charming and stylish design and appearance.
Are throw blankets still trending in 2026?
Yes. Throw blankets are not just simple accessories, but essential elements of a stylish and modern home. As people spend more time at home, they look for stylish throw blankets that provide aesthetic value and physical comfort.
Can throw blankets be used year-round?
Yes, modern throw blankets can be used year-round as they are made of natural materials like cotton, bamboo, or linen blends. They are lightweight and are perfect for summer. For year-round use, go for breathable materials that can regulate.
How do I style throw blankets without cluttering a space?
Don’t use multiple small blankets and make the room cluttered. Just use one statement throw blanket as a focal point. Fold it for formal spaces and drape for casual areas.
What materials are best for everyday throw blankets?
If you want to use it daily, you can go for cotton blends as they offer a balance of softness, breathability, and machine-washability. Some homeowners also go for high-quality luxury faux fur throws that offer premium durability and warmth.
Conclusion: Why 2026 Is the Year of Thoughtful Comfort
While decorating your home, you must have one thing in mind- transform it into a sanctuary. Throws can help you achieve the style and comfort you look for. Made from natural cotton, bamboo, or linen blends, they regulate temperature and give an ultra-rich look to the space. They perfectly balance the comfort and look to make your space more vibrant, relaxing, and rejuvenating.
Focus on individuality, material integrity, and versatile design to transform your bedroom or living room into a place where you can unwind.
Read more on WCCO

Virginia Charter Bus & Minibus Rental: Comfortable and Reliable Group Transportation

Is Trade 1000 Urex Legit? Honest Review of AI Crypto Bot for 2025

Tax and Finance Guide for Self-Employed Barristers in the UK

A Complete Guide to UploadArticle.com: Your Platform for Sharing Articles Online

Understanding 123safe67: A Full Guide to Better Online Protection

seo companies 2025 aelftech com – A Close Look at Services & Results
-
 Business5 months ago
A Complete Guide to UploadArticle.com: Your Platform for Sharing Articles Online
-
 Tech4 months ago
Understanding 123safe67: A Full Guide to Better Online Protection
-
 Tech4 months ago
seo companies 2025 aelftech com – A Close Look at Services & Results
-

 Lifestyle5 months ago
Understanding Archivebate: A Full Guide to the Webcam Archive Platform
-

 Tech4 months ago
Progressive Web Apps vs Native Mobile Apps: Which Should Dubai Businesses Choose?
-

 Tech5 months ago
Understanding Crackstube: A Complete Guide to the Term, Sites, and Safe Choices
-

 Business4 months ago
Brisbane Local SEO Companies Aelftech Com: A Complete Guide to Top Services in 2026
-

 Business4 months ago
The Ultimate Guide to UploadBlog Guest Post: Everything You Need to Know